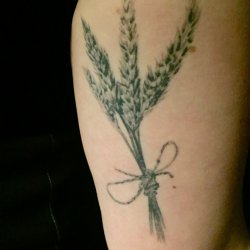
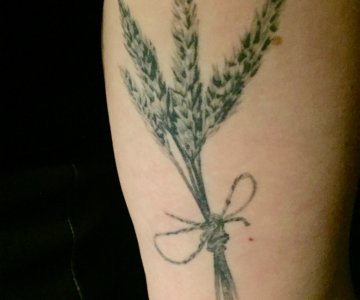
Korn samlet med snor / Grain gathered with straw: Denne tatovering får for mine bedsteforældre, hv
Se næste indlæg >

Makeup look by my sister!
I sommerhuset lavede mit søster et makeup look på mig. Min søster er utrolig dygtig til at ligge makeup, og kan godt lide at øve sig på mig når vi har tid sammen. I kommer også til at se mere til hende snart, da vi har aftalt at optage et look sammen meget snart. Forhåbenligt får hun snart hendes egen youtube kanal, så folk kan følge hende der. Jeg har selv lært alt jeg ved gennem hende og youtube videoer. Vi filmede desværre ikke dette look, men vi dog gradvist noter og billeder så i kan følge med.
My sister made a makeup look on me. She’s very good at applying makeup, and loves to practice on me when were together. Hopefully she will get her own youtube channel soon, so people are able to see her skills. Unfortunately we didn’t film this look, but I wrote notes and took pictures so you were able to see the process.

Jeg har puttet ansigtscreme på og ladet det trække ind. I’ve used my facelotion and let it dry into the skin.
Foundation blev duppet ind i huden med en beauty blender og derefter er concealer påført. The foundation was applied with a beauty blender. Concealer was applied.
Concealer blev blendet ud med beauty blenderen, hvorefter bronzer blev lagt under kindbenene, i panden og under kæben. The concealer was blended with a beauty blender. Bronzer was applied under the cheekbones, in my forehead and under my jawline.
Pudder blev påført i ansigtet, mens de highlightede steder blev fik påført en lysere pudder. A light powder was applied to the highlighted places, and my normal powder was applied to the rest of my face.
Highlighter blev påført på toppen af næseryggen, næsetippen, på det øverste af mit kindben, under øjenbrynet og over øjenbrynet. Highlighter was applied the bridge of my nose, to the tip of my nose, the top of my cheekbone, on my brow bone and above my brow.
Blush blev lagt på kinden og op mod øret. Blush was applied to the apple of my cheek and led up to my ear.
Mine bryn blev markeret med en mat brun øjenskygge. My brows were marked with a matte brown eyeshadow.
Alle farverne er fra Gwen Stefani eyeshadow palette fra Urban Decay. All colors are from the Gwen Stefani eyeshadow palette from Urban Decay.
1. Farven Blonde blev påført på øjenlåget og op til øjenbryn. Et let lag som hjælper med at blende resten af øjenskyggerne ud.
The color Blonde was applied on the entire lid (up to the brow). It helps blending the rest of the eyeshadows.
2. Farven Stark blev påført i globelinjen. The color Stark was applied in the crease.
3. Anaheim i globelinjen. Lav et skråt V op mod slutningen af øjenbrynet. The color Anaheim was also applied in the crease. Make a slanting V up against the end of the brow.
4. Blend kanterne med ren blending brush. Blend the edges with a clean blending brush.
5. Farven Zone påføres i globelinjen og i V’et. Apply the color Zone in the crease and in the V.
6. Blend farverne sammen. Blend all the colors together.
7. Påfør farven Punk i globelinjen og i det yderste af V’et. Apply the color Punk in the crease and in the outer of the V.
8. Blend farverne i V’et ind mod midten af øjenlåget. Blend the colors in the V against the middle of the eyelid.
9. Blend kanter i det yderste V. Blend the edges of the outer V.
10. Fyld V’et ud med farven Punk (1/3 af øjenlåget). Fill the V with the color Punk (1/3 of the eyelid).
11. Blend V’et ind mod midten af øjenlåget og ned ad. Blend the V against the middle of the eyelid and down to the bottom of the eyelid.
12. Sprøjt Mac Prep + Prime Fix + på flad øjenskyggebørste og brug farven Steady på 2/3 af øjenlåget. Put some Prep + Prime Fix + from Mac on a flat eyeshadow brush and use the color Steady on 2/3 of the eyelid.
13. Blend Steady sammen med V’et. Blend Steady and the V together.
14. Sprøjt Mac Prep + Prime Fix + på liner brush og brug farven Pop i den inderste øjenkrog. Træk farven lidt ind mod øjenlåget og under øjet. Put some Prep + Prime Fix + from Mac on a liner brush and use the color Pop in the inner corner. Pull the color a little towards the eyelid and under the eye.
15. Put Annaheim på accent brush under øjet, før farven op til V’et. Apply the color Annaheim on a accent brush under the eye and link the color to the V.
16. Blend farven under øjet ud med en smudge brush. Blend the color under the eye with a smudge brush.
17. Påfør mascara på de øverste og nederste vipper. Apply mascara to top and buttom lashes.
18. Brug liplineren Nude pink fra Nyx. Use the Nude pink lipliner from Nyx.
19. Påfør liquid lipstick Celebrity Skin fra Jeffree Star på læberne. Use the liquid lipstick from Jeffree Star in the color Celebrity skin on the lips.
20. Brug All Nighter Long- Lasting Makeup Setting Spray fra Urban Decay. Use the All Nighter Long- Lasting Makeup Setting Spray fra Urban Decay.


Ingen kommentarer endnu